Power Platform Tools for Visual Studio
Install Power Platform Tools, scaffold a Visual Studio solution, create a plug-in from Power Platform Explorer, and deploy it with CrmPackage.
Power Platform Tools is the Visual Studio extension for Dataverse plug-ins, custom workflow activities, and solution deployment. It scaffolds the projects, keeps the plug-in registration file in sync, and deploys the assembly and steps into a Dataverse solution.
This post walks through the path those screenshots show: connect to an environment, create a plug-in class from a table in Power Platform Explorer, then deploy from the CrmPackage project.
Use a development environment. Deploying from Visual Studio writes assemblies and steps straight into the environment you are signed in to.
You need Visual Studio 2019 or 2022, C#, and .NET Framework 4.6.2 for plug-in and workflow projects. A Power Apps trial environment is enough to follow along.
In Visual Studio, open Extensions > Manage Extensions, search the Marketplace for Power Platform Tools, and install the build that matches your IDE:
| Visual Studio | Extension name |
|---|---|
| 2019 | Power Platform Tools |
| 2022 | Power Platform Tools for VS 2022 |
The menus stay hidden until the solution contains at least one project created from a Power Platform Tools template. Opening a normal class library does not turn the tools on.
Custom workflow activities also need the Windows Workflow Foundation component from the Visual Studio Installer.
In File > New > Project, search for Power Platform and start from Power Platform Solution Template. That template creates a Visual Studio solution, which is not the same thing as a Dataverse solution. The template then asks you to sign in and pick (or create) the Dataverse solution that will own the deployed components.
A Power Platform solution must contain exactly one CrmPackage project. Deployment fails without it, and it also fails if you add a second one. Leave CrmPackage in the solution.
The template can add these projects beside it:
| Template | What it builds |
|---|---|
| Plug-in Library | The plug-in assembly (DLL). Target .NET Framework 4.6.2. |
| Workflow Activity Library | Custom workflow activity assembly. Also 4.6.2, and it needs Windows Workflow Foundation. |
| Customizations | Solution customizations that deploy with the package. |
| Package (CrmPackage) | The deploy project. It references the other projects and owns RegisterFile.crmregister. |
The solution in the deploy screenshot is that layout: CHA.Customizations, CHA.Workflows, CHAPlugins, and CrmPackage inside PowerPlatformVSSolution2.
Only projects created from these templates belong in this solution. If you add an existing plug-in project later, also add it as a reference under CrmPackage. If you remove one, delete its registration XML from RegisterFile.crmregister, or the next deploy will still try to push it.
Tools > Connect to Dataverse signs you in and binds the solution to an environment and a Dataverse solution. That solution is where the plug-in assembly and steps land, so pick the unmanaged solution you actually export, not the default solution, unless you mean to.
View > Power Platform Explorer is the environment tree: tables, plug-in assemblies, the event catalog, and related registration nodes. Right-click a node to see what the tools can do there. After a deploy, use the refresh icon on that view before you look for the new assembly.
Expand the environment, then Tables, and right-click the table the step should run on. Create Plug-in opens the step registration dialog.
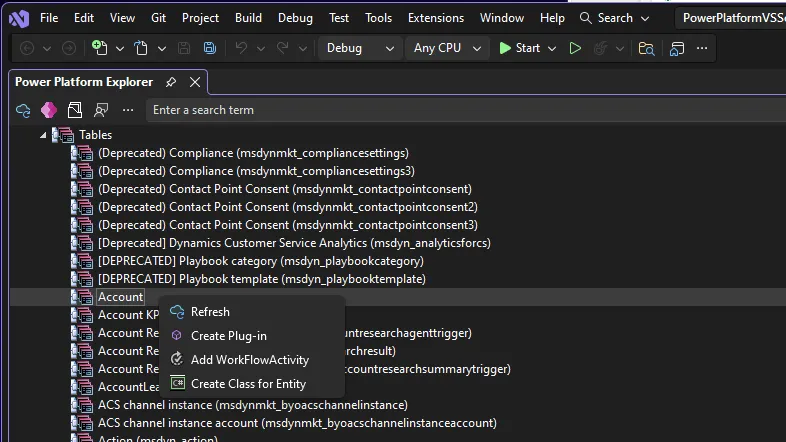
The same menu also offers Add WorkFlowActivity and Create Class for Entity. Create Plug-in is the one that generates a plug-in class and a step.
In the dialog, the class name becomes the C# class. Handler Assembly is the plug-in project that receives the file. With a single plug-in library in the solution, that field stays fixed on that project.
Registering the step does not upload anything yet. It writes the class into the plug-in project and a matching entry in CrmPackage/RegisterFile.crmregister. Build and deploy before the assembly and step exist in Dataverse.
The generated class derives from PluginBase, which the plug-in library template adds for you. Keep that base class. The usual IPlugin.Execute method shows up here as ExecuteCdsPlugin, and the TODO comments are where the business logic goes:
protected override void ExecuteCdsPlugin(LocalPluginContext localContext){    if (localContext == null)    {        throw new InvalidPluginExecutionException(nameof(localContext));    }
    ITracingService tracingService = localContext.TracingService;    IPluginExecutionContext context = localContext.PluginExecutionContext;    IOrganizationService service = localContext.OrganizationService;
    // Plug-in logic goes here.}
A second class in the same library is another Create Plug-in on a table, with the same handler assembly and a new class name. After the assembly is already deployed, you can also right-click it under Plug-in Assemblies and choose Add Plug-in.
To add only a step on a plug-in that is already registered, right-click that plug-in and choose Add Step. A new step does not need a rebuild. A new class does.
Use the explorer menus for this. Hand-editing the class and the .crmregister file separately is how the deployed step and the code drift apart.
On the plug-in project, open Project > Properties > Signing, check Sign the assembly, and point it at a strong-name key file. Do the same for the workflow activity project if you deploy one.
Build the plug-in library, then deploy.
Deploying the plug-in project pushes that assembly and its steps. Deploying CrmPackage pushes every project in the Visual Studio solution: plug-ins, workflow activities, and customizations.
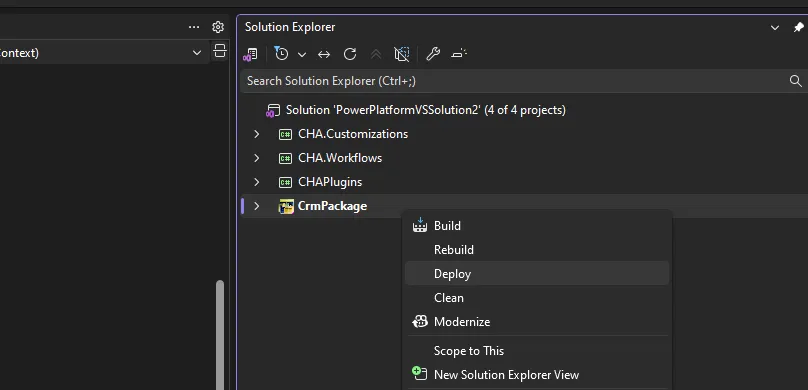
Right-click CrmPackage and choose Deploy, as in the screenshot, when the change spans more than the plug-in project. A successful run ends in the Output window with Deploy Result: Successful.
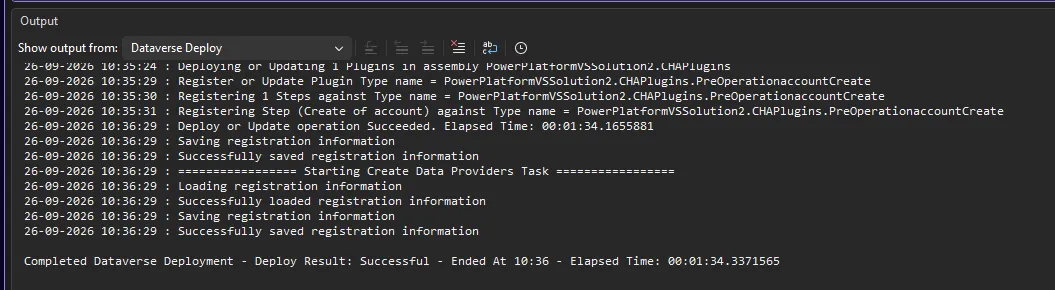
After it finishes, refresh Power Platform Explorer and expand Plug-in Assemblies to confirm the assembly and step. Delete Assembly on that node unregisters the assembly and its steps. Your account needs delete rights on the assembly, or it has to be the owner.
A few things worth doing in the same solution once the first deploy works:
- Add a pre-image or post-image from the step’s context menu, and request only the columns the plug-in reads.
- Install the Plug-in Profiler from Plug-in Assemblies in Power Platform Explorer if you want to debug a failed execution. The profiler is a solution in the environment, so install it on the dev environment only.
- Keep
RegisterFile.crmregisterin source control with the projects. That file is the deployment manifest the tools maintain.
Official references for the same flow: